Tuesday 19 June 2012

Magnolia Bakery Cookbook

If I haven't told you before, allow me to fill you in now. 
I have an addiction. 
Yep...it's true. 
A very deep addiction to cookbooks. 
I will rather sheepishly admit that my heart skips a beat when I have to do a big grocery shop because I know there are tables of discounted cookbooks at our local store all the time. 
And I just never know which cookbook I will have to buy. 
I'm telling you, it's a disease. 
Not because cookbooks are bad...but because I very rarely use them after I've purchased them!! 
Someone please tell me I'm not alone in this craziness. 


Well, last Christmas I spotted this cookbook
I knew I had to have it, but I thought I'd be smart about it this time and add it to my Christmas wish list instead (it's not as bad then, right?). Well, hubs was already going a different direction with gifts (lots of fabulous photography goodies), so I was left with no choice but to go out and buy it for myself after the holidays. Right? 

Well here's the thing. I went on a diet right after Christmas. I've never been there, so I can't say for sure, but I have a feeling that diets and Magnolia Bakery don't mix well. 
So the cookbook sat all sad and forlorn for months. 
Until today! 


My little 3 year old missy and I decided to make their recipe for Banana Coconut Pecan Bread. 
Looks yummy, right?


I indulged in a little slice (still warm, thank you very much) along with the kiddies and...mmm...it has a beautiful, light texture and the toasted pecans and shredded coconut add a nice, subtle flavor.
I like that they called for toasted pecans instead of the usual walnuts. And the best part? It calls for 1.5 cups of mashed bananas! My hubby is the only one who really eats bananas around here and to say he's picky about the ripeness of the banana, would be putting it mildly. A little too yellow and he will turn up his nose. Needless to say, I have a freezer shelf full of too-yellow frozen bananas waiting to be used up. 
I used five bananas for this recipe. Score!! 


I thought the idea of baking it in a tube pan was a fun twist (their instructions)! 
Has anyone else ever baked their banana bread this way? I kind of like it! 

So far I'm impressed! I'm really looking forward to baking my way through the whole cookbook! Maybe by the time I've gone all the way through, I'll be able to visit the real bakery in person. Wouldn't that be fun?! 

Interested in getting a copy for yourself? 
You can buy it online here

(And no, I haven't been paid for this...they don't have a clue who I am. 
I just felt like telling you all about it today!)

= )

Monday 14 May 2012

Add Some Summer Freshness to Your Sheets!! (DIY Linen Spray)

There's no doubt about it...we are heading full tilt into my favorite season. 
I love, love, LOVE summer. 
Every single thing about it (except the noise of the fan at night and the mosquitoes, but that's it.). 
But probably my most favorite part about this time of year is being able to throw open the windows and doors in the mornings and let the fresh, cool air in. Aaaahhh. 
Lucky me - I inherited my dad's very sensitive sense of smell (that was a blast when I was pregnant. Not.), 
so stale house smells drive me around. the. bend. 
A few years ago, in my daily battle to keep a fresh smelling home, I discovered a recipe for make-your-own linen spray. (Unfortunately I don't have the source of this recipe anymore.) I was all over that, let me tell ya. 
I started making it and spraying it on our bed linens in the mornings when I made up the bed and, even though I'm not a huge fan of the scent of lavender, I LOVE the freshness this spray adds to the sheets. Divine! 
Hubs will even comment on how much he loves that first wave of lavender when the comforter is thrown back at night. I'm sure he loves me for sharing that with you too. : )


Think it might be too complicated to make? 
Think again. 
It doesn't get any easier than this, my friends. 


All you need are three simple ingredients:
2 cups distilled water
4 oz. vodka
40 drops lavender essential oil (or any other essential oil you prefer)

You'll also need an empty, clean spray bottle. 


First measure out the vodka and pour into the bottle, then add the essential oil. 
Shake it up really well. The alcohol mixes with the oil, whereas the water will not...so ya need it in there!


Then add the water. 
Screw the top back on, shake it up again and wipe the sweat from your brow. 
Now go throw some windows open and spray those sheets!
 Then you may pour yourself a cup of coffee, sit down, breathe in the freshness and pat yourself on the back for having achieved total domestic goddess status. 
: )


Enjoy!
---------------------------------------------------


Feathered Nest Friday


Funky Junk's Saturday Nite Special


Weekend Bloggy Reading

Tip Junkie handmade projects


UndertheTableandDreaming


DIY Project Parade
It's Just Called Spicy

To see the other great parties I'm linking up to, click HERE!

Sunday 29 April 2012

Mossy SPRING Sign!

Hello there! 
Wow - I feel like I owe all of you a big apology for being MIA, AWOL and having appeared to jump ship this month...yikes! I've been trying to figure out how to balance my mommy role with blogging ever since Christmas and apparently I haven't done a very good job of it! Let me tell ya...my hat is off to all you ladies out there that have figured it out...you're amazing!!!
Anyhow...don't give up on me please! My mind is still always whirling and swirling with ideas to turn into reality! 

Here's an idea that I chewed away on for a while...


I've been wanting to make some mossy letters spelling out "SPRING" ever since last year, but this year decided it would really happen. My original idea was to have them freestanding...until I brought them home and realized that...hmm...a "P" doesn't stand up so well on it's own. 
And just a side note here...I realize that for the majority of you - you're probably close to heading into summer already (and I'm terribly envious of you, so don't tell me!!)...but us shivery souls up here in Alberta are just starting to see a few blades of green grass and some swelling buds on the lilac trees...so we're only really just beginning spring!


That's when I remembered some planks of wood that the previous owners left behind. 
I started to think that maybe a quick white wash would be just the ticket...


So that's what I did. Now, let me say...I've never white washed anything before so I don't know if this is how you're "really" supposed to do it (how often have you read that line in my posts?!), but it worked great for this purpose. I just stirred together one part white primer to one part water, then slapped it on. 
I gave the front two coats and the sides and back one coat. I found you could play with the application a bit to get a thicker coverage in some areas, but quite honestly, there was very little "playing". 
I just wanted to finish it before summer arrived. :)

At this point, if I had been thinking (and Hubs had been around because I am tool challenged),
 I would have attached some picture hanging devices on the back. Like those saw tooth thingies, or even some circle screws and wire or something
But, I didn't, and therefore this is now a prop-up-on-a-shelf-only kind of sign. 


Here are the infamous letters that won't stand on their own. I picked them up from the dollar store, and I really liked the size of these letters - roughly 6" tall. 
(The board, by the way, is 10" tall and just over three feet in length.)


Next I pulled apart some Indian Moss and used LOTS of hot glue on the letters and pushed the moss into the glue firmly. Sometimes I would turn the letter over and press down as well, so that the moss was very firmly glued. It's not much fun dealing with falling moss weeks after you thought you were done with the project, so it pays to take your time at this stage! After the moss was applied to the front of the letters, I slowly glued on little pieces around the edges, and pressed the moss in firmly. You can trim off any sticky-outy bits with scissors at this point so that the shape of the letter is crisp and clear. 


Next I glued some tiny little craft eggs into a small grapevine nest - also from Dollarama. 
I thought the nest would make a cute extra springy touch next to the letters.

The last step is to firmly glue those letters into place, making sure you measure and space them out properly, and then glue the nest in beside the letters. Voila!


I big fat heart the whimsical touch it adds to my kitchen shelves! 


After looking at it for a few days, I decided perhaps a sign saying "HOME" would be just as fun and a little more permanent. So...hi ho hi ho...it's off to make another sign I go!! 

Before I do that, however, I want to say a big WELCOME to all the newest followers of BPP!!
To show what a computer/blog savvy person I am (big time sarcasm there), I just recently figured out that there are people - and quite a lot of you at that! - who follow by email!! 
Wow! I'm so glad I know about you now! I feel so honored and humbled by all of you that you are actually interested in what I might have to say...what a great community to be a part of!! 

P.S. I think I used the words "firmly glue" about 50 times in this post...but at least you get the idea now right? Firmly glue it!! 
: )

-------------------------------------------------------------------


Feathered Nest Friday


Funky Junk's Saturday Nite Special


Weekend Bloggy Reading

Tip Junkie handmade projects


UndertheTableandDreaming


To see the other great parties I'm linking up to, click HERE!

Sunday 1 April 2012

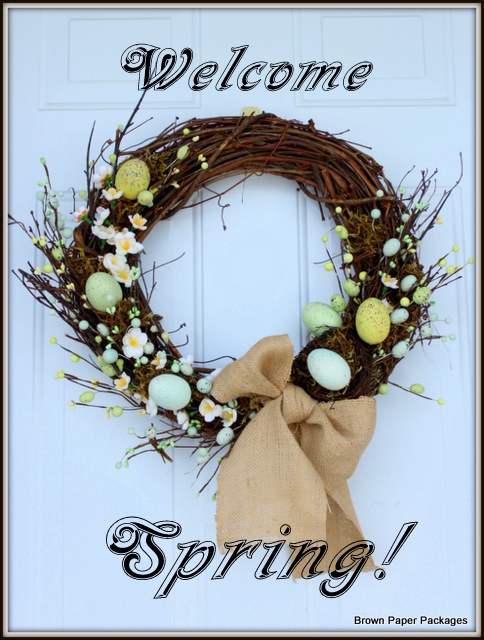
Welcome Spring Wreath!

Hello friends! How is your weekend going?

We've been looking out the window at a mixture of snow, sun, hail and rain the past few days.
 Yesterday I decided I'd had enough of being house bound, so I bundled up the kids in the stroller and off we went for a walk. I should mention it had been beautiful and sunny all morning. In my hurry to get out the door after nap time, I didn't bother to make sure it was still sunny (I know...that should have been rather obvious). About ten minutes away from the house it started to snow a little bit...then turn into an all out thunder/hail storm. Yay.
In spite of it, the kids seemed to enjoy it all from under the safety of the stroller "roof" and it was definitely good to get some fresh air!
Hail, snow or sun...this week I decided it was high time to get cracking on a spring wreath.
In my last post on decoupaged eggs, I mentioned that I have held onto last year's Pier 1 flyer all year since I knew it would provide some great inspiration this year!

When I saw this wreath/topiary...I knew I had to try it for myself!

Pretty hey?!
 I loved the idea of the topiary, but in the end I decided to keep it
simply as a wreath to hang on the front door.


It took a few weeks to gather up all my supplies since the Dollar Stores in town didn't have anything that caught my eye...and because what I already had on hand...I couldn't find!!!! (Something to do with someone being a little disorganized and scatter brained, but we won't say who that is.)
I used a grapevine wreath I already had on hand, some twiggy/eggy sprays from Dollarama, a bit of Indian moss, a spray of springy flowers from Jysk and some speckled eggs I picked up last year from Homesense.


Putting a wreath together always puts me into a sweat.
I don't know why, but I'm guessing it's the commitment of it all.
Once ya glue it down, you're kinda stuck with it. I know, I'm weird.
But because of my weirdness and commitment issues, I usually lay everything out on top of the wreath first before any hot gluing begins. Anyone else do this?

After a bit of experimenting and using my Pier 1 inspiration picture, I came up with a look I was happy with and finally went ahead and glued it all down. Once I can see that it's coming together, my breathing slows down and I can relax and enjoy the process!


I used a big, fluffy burlap bow instead of flowers, but I like the whimsical touch it adds...all cozied up next to the little mossy nest!


Welcome spring!
Have you made a wreath for the season?
I'd love to hear what you did!

-----------------------------------------------------


Feathered Nest Friday


Funky Junk's Saturday Nite Special


Weekend Bloggy Reading

Tip Junkie handmade projects


UndertheTableandDreaming


To see the other great parties I'm linking up to, click HERE!


Related Posts Plugin for WordPress, Blogger...