Tuesday 24 May 2011

Mango Lime Sherbet

Here's a fun summer treat that our family loves.


Mango Lime Sherbet...yummm. It's so easy to make, all you need is some time set aside for freezing.
If I'm serving this to company, I like to make it a day or two ahead.
And then padlock the freezer to keep Hubs out.


Thinly peel two very ripe mangos.
The intensity of flavor will be mostly determined by how ripe your mangos are, so make sure you pick some good ones! Slice them up any way you can to get all the fruit off that pit.


Throw them in your food processor and add 1/4 cup of lime juice.
I used bottled lime because it's what I had on hand, but freshly squeezed limes would be divine!
Blend it together in your processor until it's nice and smooth.


In a saucepan, combine 1/2 cup of sugar with about 3 Tbsp. of water.
If you like your sherbet sweet...add a little more sugar! I like mine a little more on the tart side, so 1/2 cup works perfectly for my taste buds.
Stir the sugar and water together over low heat until the sugar has dissolved completely. Add to your mango puree. Mix it together well and store in the fridge for a couple hours.

(I am not a great time manager and of course forgot to calculate freezing times, so once I realized I started this too late in the day...I just left it in the fridge until the next morning. Unless you're a serious night owl, it's probably best to start this in the morning, not mid-afternoon!)


Give everything a good pulsing in your processor again.


Then pour into a container and cover with plastic wrap, or with the container's lid, if it has one.
Try to store as flat as possible in the freezer, so everything freezes evenly.


Once the sherbet is about half-set (solid, but not completely firm...see my fingerprints testing it out?! Shhh!), which takes roughly 3 hours, scoop it all out and put in your food processor again.


Give it a really good stir...pulse...mix(?)...what's the proper term for food processing?? You may have to stop and push the big chunks down to the bottom, if your sherbet is too firm.


Keep it stirring...pulsing...mixing...whatever...until it gets to this nice, creamy smooth consistency. Mmmm.
Repeat the process one more time. Back in container, freeze until semi-firm, scoop it out and stir, pulse, mix.
Return to freezer until you're ready to devour inhale serve it.


Here's a tip for all you entertainers out there. My parents did this once when I was five or six and I've never forgotten it, and used it myself several times!
Once the sherbet has frozen to a good "scoop-able" stage (soft, but firm enough to hold it's shape), use your ice cream scoop to make individual servings and put each ball on a wax or parchment paper lined cookie sheet. Return to the freezer until completely solid, then carefully put your scoops into a container with a lid and store until you're ready to serve it.
 Or - if you intend to use the sherbet for a palate cleanser course, use a melon baller instead of an ice cream scoop to make smaller servings.
This little trick makes serving so much quicker and easier!

I remember my parents putting all the scoops into a huge brandy snifter and serving it buffet style with cake and other desserts. It makes for a beautiful presentation!

Enjoy!!

-------------------------------------------------------------------------------------

I've linked up to I Heart Naptime's Sundae Scoop

Monday 23 May 2011

Garage Sale Season Has Begun!

Garage sale season has started here! I've discovered it's pretty serious business in this town too!
I've also discovered that I have to be one of the worst garage salers (is that word?) in existence. 

 There's just something about the thrill of the hunt that gets me going...I look forward to them all week.
The anticipation of what I just might find is pretty high.

And then I get out there.
And something goes wrong. All wrong.


I found the a sign for this garage sale on my morning run. As soon as I got home, I jumped in the van and raced over. That's where I found these old windows. When I asked how much, the lady said, "how about a dollar each?"
Now. It seemed to me that was a pretty sweet deal. This is where everything went downhill. A dollar?!?! You'd think I could keep a straight face. But noooo....I had to go on an on about them only being a dollar and how I felt like I was stealing from her and blah, blah, blah. She left to help someone else, so when I came back to look at the stack of windows again, I kept on blabbering about how little she was asking for them. Her friends agreed she wasn't asking enough. Which made me feel even more guilty! In the end....I left with three windows and paid $10 for them. You do the math. I stink.

The only redeeming factor was that it was a fundraising garage sale for a church (I found out later).


The next weekend, I set out to find the Farmer's Market.
I'm new in town, remember, so it was a little tricky. But I found the building, packed the kids into the stroller and marched in. Someone at the door threw a bag into my hand and said I could fill it up for $2. Wow!
Then my eyes adjusted. I most definitely was not at the Farmer's Market. I still have no idea what it was all about...but it was a group sale in a small room where I couldn't escape without being noticed.
I threw four little grapevine wreaths in the bag to make a sympathy purchase, paid and left still wondering where the Farmer's Market was.
(I did find it eventually)


Next weekend I thought I'd be super smart and beat the crowds, so 3:30 Friday afternoon I packed my kiddies up again and drove around scouting out the sales. I found a very small sign for a moving sale, so I pulled over. No one else was in sight. This might be great news for some. But for me...I'm a little shy and I really don't like wandering around with everyone watching me. Well, the owner stood behind the table, arms crossed, silently watching ....along with her 4 yr. old daughter. Gaah. This is where I buckled...I couldn't not buy something with them staring me down like that. But I didn't want anything she had! In an effort to escape once again, I grabbed an old bleach bottle that looked interesting, paid $2 for it and ran away.


The next day I drove out to a greenhouse just outside of town. One of the farms was having a sale, so of course I had to pull over. Mercifully there were people everywhere so I knew I wouldn't have to make another sympathy purchase...phewf. That's when I found some more old windows! Now you gotta understand...I love me some old windows...but they really don't work with my current style!


Apparently that doesn't stop me, cause I came home with these two beauties.
I very sheepishly left them by the fence when I got home and didn't breathe a word to hubby about it.
Now I have a storage room full of things I have no idea what to do with, didn't necessarily want, and paid too much for. See? Worst garage saler in existence.

But is that gonna stop me? Nope.
I'll be out again all excited about what I just might find!!!

Thursday 19 May 2011

Cement-Look Candlesticks


It's no secret. I may be trying my hand at contemporary decor inside, but when it comes to outside...there's no swaying me from Old World style. I. love. it. In capitals with exclamation marks after.
Crunchy gravel pathways, weathered wood, stone walls, mossy cement...mmm...I love it all. Red geraniums in terra cotta pots just make my heart go all pitter patter.
A few weeks ago, I was dreaming up some ideas for our backyard and the wheels got to turning...


I took a pair of totally-wrong-color-for-this-house candlesticks...


And two remaining cylinder vases/candle holders (?). They were originally part of a set of three...you know the ones...they were used for every wedding centerpiece in the country a few years back...


I had originally tried to paint the candle sticks white, but completely botched it up somehow. I'm still really not sure what went wrong! I just knew they were ugly enough I wouldn't be using them again!
(Excuse the playdough paraphernalia in the background...but it was a great way to keep a curious two year old occupied while Mama played!)


I picked up a container of spackle from the hardware store and fished out an off-set spatula intended for cake decorating (from my drawer - not the hardware store!).
By the way...I love this spackle!! It's goes on pink, but dries white!


Then I tried to somehow create the look of cement. Now, I am no artist so don't be too hard on me! Somewhere in blogland, I came across someone who was using a technique similar to this, but for the life of me, I can't remember anything past the use of spackle and that it looked cool!
Anyhow, it wasn't too difficult. I just kind of smeared it on and played with it until I thought it had the potential to eventually look cement-ish.


On one candlestick, I smeared more "up and down" and on the other one more "around" in circular motions.
If you are thinking of trying this yourself, I'd recommend going up and down, rather than around, as that tended to look a bit messy after it was painted.


Then I put it out on the deck to dry good and solid in the sunshine.
After it was completely dry, I kind of rubbed my hand all over it to soften up any hard edges and pokey bits sticking out....


Then a solid coat of black spray paint...


I didn't worry too much about the paint drying thoroughly, so a few minutes later I gave it a medium coat of grey paint, trying not to cover all the black. Light spraying will do the trick.
If I'd been paying attention at the store (tough to do with two fighting toddlers in the cart!), I would have bought grey paint...not shiny aluminum paint! Ah well!


So, to calm down the shininess (hard to see in the picture), I did some reeeally light shots of cream paint still trying to sort of layer all the colors and still keep some of the depth from the black paint.


This time I let them dry for a while...but probably only because I had to make lunch or do the laundry. Then I gave them a light sanding all over to soften up the edges some more. Once the paint is applied, it's easier to see if you're getting anywhere close to a "cement" look, and mine definitely needed some sanding!!


Next I took some acrylic paints...Burnt Umber and Dark Forest Green...and used a cotton cloth to dab with. (Hubby's ratty old undies work great for this! Shhh! I didn't tell you!)

So ummm...moving right along...I tried to get both the green and brown on the cloth at the same time, and then dry rubbed it all over. The Burnt Umber picked up really well in the sanded areas, so I had to be careful not to use too much. Then I went over it again with only the dark green, intentionally leaving some spots darker. I was trying to go for a mossy look, so I also used some light leaf green in different spots to create more variation.


I had this plant stand already, and really liked the finish on it, so I used it as a color guide.
Phewf! That was a lot of painting and layering!
After everything was dry, I attached the glass cylinders with some clear silicone and let it dry overnight. Sooo easy to do!


I think I'd apply the spackle a little smoother next time...
but over all, I'm really pretty happy with them!

And now I'm really looking forward to enjoying a glass of Pinot Grigio
 by candlelight in the garden with my honey one of these evenings....

---------------------------------------------------------------------------------

I've linked up to Centsational Girl's Outdoor Ideas party.

Wednesday 18 May 2011

Lamp Recycle!

Several years ago, a someone gave me the lamp pictured below. I never particularly liked it, but I always thought it had nice lines and good potential to become something better.

(Have you ever noticed almost all my "before" pics are taken in this spot? Apparently this is my work space for more than just cooking. No wonder I feel like I live in the kitchen!)

I've moved five times in the last ten years and this lamp has followed me everywhere but somehow the inspiration never hit me until now. I'm sorry poor lamp...


I debated over black or white paint for the base. But knowing that I was going to wrap the shade in jute (are you starting to think I'm a one-trick pony yet?), I thought it might look a little too "beachy" for our house. Now I love the beach house look...but when ya live a full days travel from the nearest ocean...well...I don't think I'd be fooling anyone. And besides, I really love the look of black with the great texture and color of jute twine.


Now you know this is going to be dismantled by little hands in a few seconds flat, right?
So I think I'm gonna sit here and enjoy this now while I can....

I'm linking up to Thrifty Decor Chick's spray paint party.

[image[7].png]

Sunday 15 May 2011

My Kind of Recycling!

Remember this room?


Yah. The one that's supposed to be my office/craft/sewing room. This picture was taken a few weeks after we moved into our house, and I'd love to say it looks different now, but then I'd be telling a big fat lie.
It's jammed full of different decor items I've acquired over the years and don't quite have the heart to part with yet. Umm. There are a few problems here though...hubby uses this room for his work clothes and has to wade through knee deep treasures every morning to get to them.  Most of my items are rust, moss green, mustard yellow or have an oil rubbed bronze finish. Which looked nice in our last house, buuuuut...not so much in this house.
And...I kinda, sorta get this miserable little vibe that their days are numbered before a certain mister decides to take them on a little field trip to the dump when I'm not looking. Gasp! Say it isn't so!

So what's a girl gonna do when she loves her stuff, but her stuff doesn't love her house??


I got these apples off a clearance rack at Pier 1 and I still love them, but I'm really over the celery green now.


I really love this Winners clearance bitty too, but the ORB finish just isn't cutting it now.


How 'bout wrapping it up in twine?!

My fingers have barely recovered from all the hot glue!!


How about a shot of white paint?

Now that nice weather is finally here, I'm finding myself eyeing a lot of different pieces and threatening them with a white wash. I guess my love affair with black paint was a little short lived....

Now that's my kind of recycling!!

And as you can see, I've got my work cut out for me with all those things lining the shelves, furniture, and floor...so stay tuned to see what's coming down the line!

Tuesday 10 May 2011

Decisions, Decisions...


Does anyone else pick their paint colors this way?


What...you don't decide to match your walls to your hand soap?


Well I think I might. See that burgundy colored wall there?
(I'm sure there's a much less 80's era descriptive word for that paint color, but I don't know what it is. Sorry!)
I no likey. In fact, me hatey. Me want to draw all over that wall with felt pens....that's how much I don't like it! Thankfully it's just a small wall between the kitchen and living room. So I'm thinkin' hand soap aqua or perfume bottle turquoise might look just swell here. What do you think?

I'll tell you what I think! I think I love them both so much I'm not even gonna tell my hubby until it's done!! Wheeeeee!!! Happy post-Mother's Day to meeeee!!!

The question is...which one?

Monday 2 May 2011

Not Always So Black And White!!

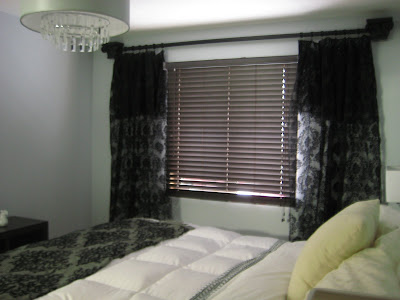
So. I feel a bit dumb about this post. For some reason, I find updates about our bedroom re-do sooo hard to write! I mean really - who wants to read about my curtains? Probably no one. Except maybe my mom. Hi, Mom! Then again, I know I kind of rather like reading about other people's curtains...so...silly post or not...here's the skinny on my curtains...err...drapes?

Basically I came thisclose to unknowingly derailing my whole plan of going contemporary. I like black, I like damask fabric and I like a thrifty find. The panels you're looking at fit the bill in every way. So, I clipped them up. And by the way, this is my first experience with drapery clips and I have to say I LA-HUVE them....can it get any easier? Anyhow. Not too bad, right? I really, really like the black accents with the grey blue walls. Yum. But for some reason, it just didn't sit right. More like - it kind of drove me crazy - but I didn't really know why.


So I threw an old bed sheet up there just to see if that changed things for the better.
Nice, but still pretty froo-froo.


How about all white?
Ahhh - suddenly it feels like I can breathe again. Then I remembered my initial goal. Light, airy, bright and contemporary. Hey, that rhymed!
Some how I had managed to steer myself towards a Victorian/Gothic reproduction! Umm...not quite the look I was going for.

So much better!! Until I can find me some white dupioni silk that is actually affordable for the working class...bedsheets it is.

Now - can I rant about how much I big, fat HATE window blinds for a minute? Arrrgh! If I could, I would take every single last one down and burn them while doing the happy dance. Really can't stand the stinkers.
But, because of how our house is situated, about three different neighbors can basically see us turn over in bed...if they were looking. Hubs and I have an on-going debate where he's sure he's always making eye contact with the neighbors and I think he's crazy, cause I'm sure no one's looking. Anyhow. That's why we have blinds. Forgive me.

Next up in the room reno...our wall mounted fireplace!
 As soon as I can find the right surrounding decor!
I know...issues.
Related Posts Plugin for WordPress, Blogger...